Update 7/15/19. I want to do for you what nobody did for me. I want to show you how you can easily create your own website. It doesn't cost a lot of money either. I'm going to show you step-by-step how I did it. I'll leave nothing out. Follow along with me and at the end of this post, you WILL have a working website for your business or personal use. Then, all you will have to do is add your own words to bring it to life. How's that sound?
Step By Step Summary
Over the course of this and other blog posts, I will show you how to make a website. In a nutshell, this is what we will do:
1. Pick a website name (directions are below)
2. Host the website with Bluehost (the hosting company I recommend. Directions are below) and pay for hosting (it's not expensive)
3. Download WordPress on to the website (It's easy. The directions are below)
4. Purchase the Genesis Prose WordPress theme. Here is my review of how to install Genesis and the Prose theme
That is basically it. I have given you the tools in this post and other posts I've linked to. Just follow along as I make a website from scratch. When I am done, you will have a website. Then all you will have to do is add the content!
Website or Blog?
You may have heard of a blog as some sort of online journal —but it's really much more than that. A blog is a website! A blog is actually a “living website!” It's alive because you —if you want to —can easily add information to it on a regular basis. This is important because search engines —like Google —LOVE websites that are updated regularly.
This is very important if you want to get noticed by search engines— which I'm guessing you do since you are reading this. My websites are blogs and this is what I will teach you to create. A blog can be only one page long -or thousands of pages. It's totally up to you.
What To Blog About?
This is important. Before you begin to make your website, I want you to think about what you want your website to be about. Ask yourself these 2 questions:
1. What topics are you passionate about?
2. What would you write about even if nobody ever read it?
These are very important questions because if you pick a topic you are passionate about, then writing is not work— It's fun! If it's fun, you'll keep doing it. This is important if you decide you want to try to make money from your website (yes this is possible).
For example, one thing I'm passionate about is helping people understand dietary supplements. My blog is called SupplementClarity.com. In the beginning, nobody knew I was around. But, because I kept writing, people eventually started to notice. Now my site ranks on the first page of Google for a lot of search terms.
How To Pick Your Website Name
Pick your website name carefully. Your website name should contain “keywords” that tell search engines —and people —what it's about.
For example, Supplement Clarity is about dietary supplements.
Tips for picking the name of your website:
1. The name should have no more than 2-3 words
2. The name should contain a key word —what your site is about
3. The name should be easy to spell and remember
Because a lot of website names have already been taken, if you need to add a “dash” between the words, that’s fine. I use dashes for my websites (Joe-Cannon.com) and it doesn't hurt me in search engine rankings.
Note. Avoid the temptation of making an exact name match for your website name. For example, if you had a personal trainer website and were ISSA certified in the state of Florida don't name your site FloridaISSAPersonalTrainer.com. Sites like this have names that are basically stuffed with key words in the title. In the past, these types of sites ranked well in search engines but tended to contain crappy content. Because of this Google is cracking down on these types of sites. Follow my guidelines above and you will be ok.
Creating Your Website
When you have picked your website name, it's time to create your website. Now, I'm going to take you step-by-step through the process of registering your website name and installing the free software needed to make your website work. The software is called WordPress. Don't worry. WordPress is super simple to install. Below there are a lot of pictures to help guide you through the process. Don't worry – this is NOT as intimidating as you may think. Trust me.
The first thing we will do is register your website name and get hosting for your website. Your website will be hosted on the computers of a hosting company. I recommend Bluehost and it will be the hosting company I'll use for the rest of this tutorial. Bluehost is well respected and has great customer support if you ever need it. They also make getting your website VERY EASY. This is why I am an affiliate of them.
When you click this link BlueHost.com , you will be taken to the Bluehost website and will see this page or something very similar:
Click on the green Sign Up Now button. When you do this, you will be taken to this page:
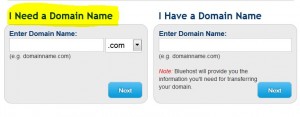
Once here, you will see 2 boxes. Enter the name of the website you would like to register in the box called “I Need a Domain Name.” It’s the box on the left.
Then click “Next.”
This will tell you if the website name you want is available or not. If the website name is not available, click the dropdown menu to see if the “.net” or “.org” versions are able to be registered.
Tip. The terms website name and domain name mean the same thing.
Another Tip. If you can grab the “.com”, “.org” and “.net” versions of your website name, Do it. If your website becomes popular, owning the different versions will prevent shady people from trying to duplicate your site name to trick people into going to their phony, boloney, bogus imitation of your site.
Step-by-Step Website Instructions
I'm now going to take you step-by-step through how I register a brand new website name with Bluehost. This way, you can follow exactly what I do.
I'm going to register a website name called Golf-Fitness-Answers.
Tip. If your website name is taken already by somebody else, Bluehost will give you suggestions of other website names that are not taken. As you can see from my example, a little trick you can do is to add a “dash” between the words. That might get you the site name you want.
If your website name is available, you'll be greeted with this screen:
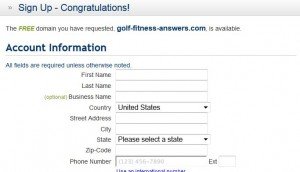
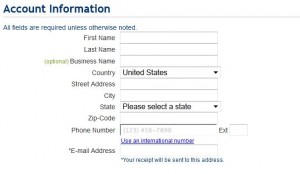
Below the “Congratulations” section, you see the Account Information section where you can enter the info needed to register your new website. Fill out this information. If you don't have a business name, no biggie, leave it blank.
Just below the Account Information section, you'll probably see something like this:
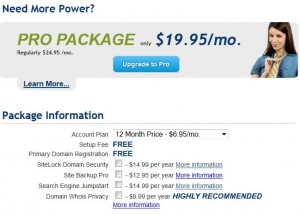
Don't worry about the “Pro Package.” I don't think most need it don't need it. Look it over just in case you think you do.
Look over the other options: SiteLock, Site Backup Pro and Domain Whois Privacy and think about if you might want them or not. I recommend you get the Whois Privacy. If you don't, people will be able to find out where you live. Get the privacy. You will be glad you did.
In the “Package information” section, choose an “Account Plan” that tells how long, you'd like to have your website hosted by Bluehost.
I've chosen the 12-month price of 6.95 per month (that's about $83.40 per year – which is a very good deal). Notice that Bluehost is not charging me for the website registration of the website. That's good!
Note. The Webhosting fee will be the biggest investment in your website. After you pay this, 99% of everything else you need to build your website is free because of WordPress plugins are usually free (see more about them below).
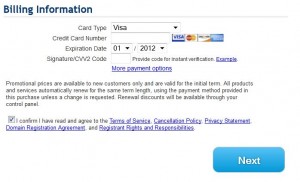
Below all this, you will enter your credit card info in the Billing Information section and click “Next”
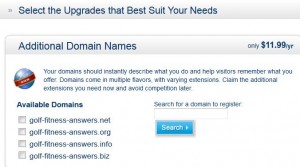
After you click Next, you will be taken to another page, where you can purchase additional domains as well as other services. The page will look something like this:
Tip. I highly recommend you grab the “.com”, “.org” and “.net” versions of your website name if you can get them. This will prevent others from duplicating your website and stealing website traffic from you. Just trust me on this. It's important.
Look them over and choose any additional add-ons that suit your needs. You don't have to choose any of these options if you don't want them. I usually leave them blank. At the end of this page you'll see:
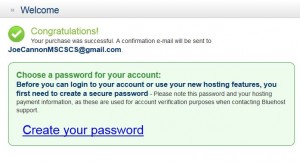
Click “Complete” to finish the checkout process. After you click Complete, you'll see the following page telling you that Bluehost has sent a confirmation email to the email address you provided them:
Now you will create a password.
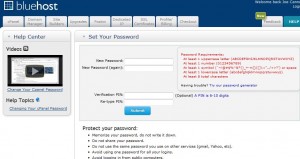
When you click the “Create your password” link, you'll see a page that looks like this:
To protect you, Bluehost wants your password to:
- be at least 8 characters long
- have at least one upper case letter and one lowercase letter
- have and a symbol and a number
Tip. Write your password down —or better yet copy it — into a document and save it. Excel is a great way to save and keep all your passwords.
If you want, you can also create a “PIN” or personal identification number. It's up to you if you want to create a PIN or not.
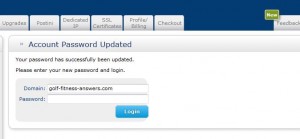
After you choose your password click “Submit.” After you click Submit, you will see a page that looks like this:
You are almost done! When you enter your password into the password box, a new window will open up (see the next picture) and allow you to install WordPress. Read below for how to install WordPress.
Tip. If a window opens up asking for the purpose of your website (personal, business, etc.), you can tell them (if you want) or click “no thanks.” and move on.
How To Install WordPress
WordPress is the free software that will be the brains behind your website. With Bluehost, installing WordPress is easy!
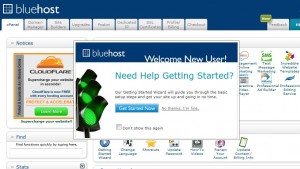
1. In the window that is on your screen now (see the last picture above), enter the password that you just created. When you enter your password and click “Login” you will see a new screen that looks like this:
If you see a pop-up window that says “Need Help Getting Started?” just click
“No thanks. I'm fine” to make it disappear.
Now, you will see a bunch of different icons. Don't worry. This is easy. Just scroll down until you see “Site Builders.” It will look like this:
See the button that looks like the “W in a circle” — That's WordPress. This is what we want!
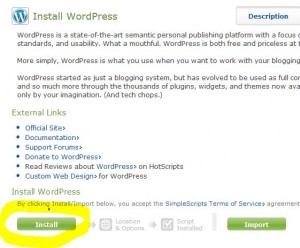
When you click the WordPress icon, you'll be taken to this screen:
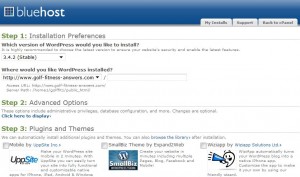
Click the “Install” button. When you click the install button, it takes you to a window that looks something like this next picture:
Don't worry. This screen looks complicated but it's not! Basically, you will leave almost everything alone. Your version of WordPress may be different than the 3.4.2 (stable) version in the picture. Again, don't worry about it. Bluehost will always automatically give you the most up to date version of WordPress.
In the screen above, I usually uncheck these 3 options:
- Cashie
- SmallBiz Theme
- Wiziapp
They are checked by default. I don't use these options and don't think you'll need them either right now, but look them over if you think you might.
At the bottom of the page, where it says “Legal Information.” Read the info if you like and then click the little box that says “I have read the terms and conditions of the GPLv2 license agreement.” Then click Complete.
When you click “Complete,” Bluehost will install WordPress onto your website. This may take a few seconds depending on your connection speed.
When WordPress is installed, you will probably see a page that looks something like this:
When it's done it will say something like “Installation Complete.
When the installation of WordPress is finished, you will receive another email from Bluehost telling you that you have installed WordPress. That email will contain:
1. a link your website administration panel (admin panel)
2. username and password
Tip. Hold on to the email they send you because you need this information to log into your new website for the first time.
Let's log into your website right now…
Setting Up WordPress
If you were to type the website of your new website into your web browser, your website would show up. When I typed www.Golf-Fitness-Answers.com, this is what I saw:
All brand new WordPress websites basically look the same—boring. This is the basic WordPress theme. Don't worry, we're going to get rid of this look in a bit and make it better.
First, though, we are going to tweak WordPress a little. These minor tweaks will make life easier for you in the future.
This tweaking is super easy! Let's do it now…
Tweaking WordPress
First, let's log into your WordPress Dashboard.
From your WordPress blog that you see on your screen now click the “Log in” link shown below:
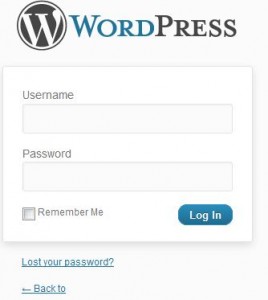
When you click on the Log In link, you'll be taken to your login screen below:
This is the screen that will let you get into your WordPress site. Your username and password were emailed to you when you installed WordPress.
Tip. If you ever need to get back to the login screen and don't know how, type “www.YourWebSite/wp-admin” into your web browser.
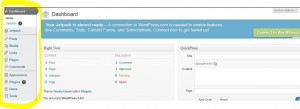
When you enter your username and password, you will come to the WordPress Dashboard which looks something like the picture below:
From here, you have all sorts of control over how your website will function. The menu on the far left side of the screen allows you to see and change different things depending on what button you click.
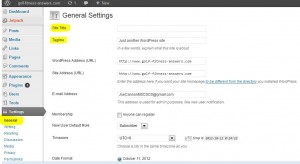
The first thing we will do is scroll down the left-hand menu to “Settings” and then click on the word “General.” This brings up the General Settings of your website. It will look something like this:
Here you can see your website name and the email where you'll be notified when you have comments from readers of your posts.
See that your Site Title at the top? I suggest you enter the name of your website here.
Just below that is the “Tagline.” The tagline is a short description of what your site is about. The tagline usually appears right under your website name. The tagline should be short and contain one or two key words.
Don't change anything else in the General Settings.
Now scroll down to the bottom of the page and click “Save.”
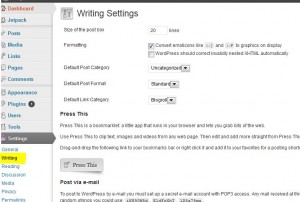
Now click on the “Writing” button in the Settings category. When you do this, you will see a screen like this:
At the top you see “Size of the post box.” if it's not 20 lines, make it 20 lines now. The post box is where you will be pasting your blog posts after you write them. This setting makes the box bigger and easier to use. Making it 20 lines works for me but, If you want to make it even bigger, make it 30 lines if you like. When you are done, scroll to the bottom and click Save.
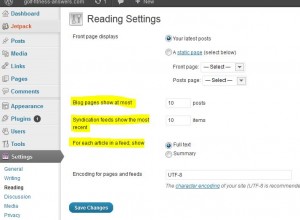
Now click Reading in the Settings menu. When you do, you'll see this screen:
The first section I have highlighted— “Blog pages to show at most” —tells how many of your previous posts to show on your website. I usually set it to 10. This means when people get to the end of a post I write, they can see the last 10 things I've written. You can set it to anything you like.
Below that is “Syndication feeds to show the most recent”. Change this to 1. This means that if people subscribe to your site (via RSS feeds), they will only get your most recent post instead of 10 posts. You can leave it 10 if you like. I prefer only 1.
Now, look where it says “For each article in a feed, show.” I prefer to click “Summary.” This means that people can only see a small blurb of your latest post. If they want to read more, they can click over to your website to see the rest. Click “full text” if you want them to be able to read everything without visiting your website.
After you've made your decision, click Save at the bottom of the page.
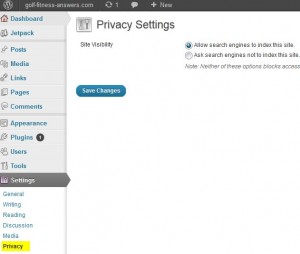
Now click on Privacy. When you do, you will see this screen:
You only have 2 options here. By default, WordPress lets search engines like Google, etc. find your website so it will start showing up in search results. I recommend you leave these settings where they are so search engines can find you.
If you don't want anybody to find you, just click “Ask search engines not to index this site.” You can always turn it back on later. I figure, what the heck, leave it on. Odds are nobody will see you in the beginning anyway.
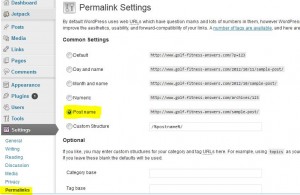
Just below privacy is “permalinks.” Permalinks are the permanent links of your blog posts. Check out the picture below:
Select “Post name.” This means anything you write will have the link structure “your website/title of your post.” Since the titles of your posts will have some key words in them, the selection of Post Name can help search engines -like Google – find you better for various search terms. This will help other people find you easier too 🙂
One more thing you might want to do is change your WordPress password. If you don't like the password that was emailed to you, change it to something you can remember. Here's how.
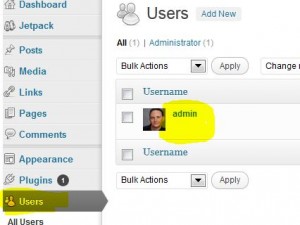
Click “Users” in your WordPress Dashboard. You will see your profile. Hover your mouse pointer over “admin” and the word “edit” will appear. Click it.
When you do this you'll see a screen that will let you change your password. Scroll down until you see the New Password section.
WordPress will even tell you how good of a password you picked. Also if you don't want your username to be “admin” you can change that too. For security reasons, I recommend that you change your user name. Do not leave it as “Admin” because it makes it easier for hackers to break into your website (you don't want this to happen!)
When you're done, click “Update Profile.”
You're done!
Remember to pay your credit card for Bluehost so you can keep your website up and running. Again, this will be the biggest investment you will have to make – at least for the foreseeable future (it was for me). Technically you can start blogging right now, but I want to show you how to make your website look a little better, so now, let's talk a little bit about making your website look good. That's where WordPress themes come in…
WordPress Themes
OK, you're done tweaking WordPress. The only thing left to consider is that your WordPress site still looks kind of… boring. But, the beauty of WordPress is that you can change the way it looks pretty easily.
There are many free WordPress themes that you can use to make WordPress look better. There are also premium WordPress Themes that you can purchase. Two of the most popular themes are Thesis and Genesis.
If you really want to blog – and get it eventually to the point where you are making money with it – I recommend you install a premium WordPress theme immediately because it will grow with you as you learn more about blogging and what you can do with your website. The theme I recommend is the Genesis Prose Theme. Here is an entire post on how to install the Genesis Theme on your website.
Just trust me…
Free WordPress Themes
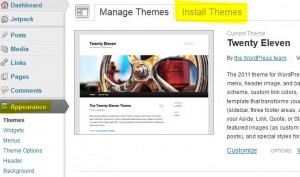
I don't recommend a free theme but to check out all the free WordPress themes, click on “Appearance ” that’s in your WordPress Dashboard.
Then, click the Install Themes tab (see pic above).
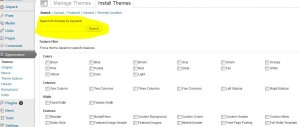
When you do this, you can sort through all of the free themes that are available. You can use the search box to sort by key term or by color or by how many columns you want.
Problems with free WordPress themes
Free is great. But not all free WordPress themes are great. For example, free themes :
1. might not be coded well (this hurts your ability to be seen online)
2. make it hard to do things you want to do
3. may not be updated regularly—or ever updated
4. have poor / zero customer support
This is why I don't like free themes. Let's talk about premium themes now.
Premium WordPress Themes
I recommend you get a Premium WordPress theme for your website. One of the themes I like is the Thesis Theme. While the other is the Genesis theme. While both of these WordPress themes are quality made, I feel Genesis is easier to use and set up (esp the Prose child theme) so that is what I recommend you get.
I like Genesis so much that I wrote a few blog posts on it to show you how to install and use it. For more info see:
How To Install a Premium Theme
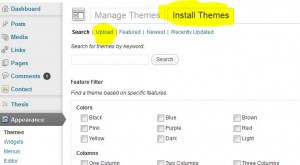
When you purchase the Genesis Prose theme, go shopping for Themes and locate Prose (themes are listed alphabetically) and save it to your desktop. Then go to Appearance (from your WordPress Dashboard) and click the Install Themes tab. Then click “upload.”
With Genesis, you will have 2 files to upload
1. Genesis Framework
2. Prose theme
Upload the Genesis framework first and then the Prose child theme.
Locate Genesis Framework and click ok The theme will be installed. Then do the same thing for the Prose theme. Remember to see How to Download and Install the Genesis theme for complete instructions.
Now you are essentially finished and your website is looking pretty good. You can start adding content now if you like.
Adding Pages To Your Website
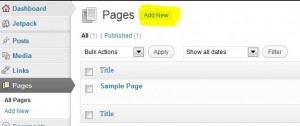
I suggest you also add a few “pages” which will appear at the top of your site. The pages tab is found in your WordPress Dashboard.
For example, do add an “About” page which tells about who you are and what your site is about. You might also want to add a “contact” page so people can contact you if they like.
Other than that, you are pretty much ready to roll right now with your new website.
Tip. Check out my post on free WordPress plugins that will help your site be more useful to you – and to your readers.
Again, once you pay for your website hosting and a Premium Theme like Genesis or Thesis, pretty much everything else you'll need to make your WordPress website run will be free—except for the sweat equity you put into making your site the best it can be. Sweat equity won't feel like work though if you're helping people. I speak from personal experience on this…






Hi Joe! Love this tutorial post. I created a website via blue host and WordPress earlier this year for my pet sitting business. I just recently became a certified personal trainer and am looking into building my site now!
My main goal is to do online training, therefor need a buying option/add on widget for clients. I’ve heard of something called wooo? (Probably spelt/got the name wrong) do you know anything about selling on WP? Thanks!
Hi Daphne, thanks much I apprecaite that! I believe you are reffing to woo commerce. Its a well respected plugin for wordpress.
I just posted an online fitness training review where I interviewed 3 people who are doing it now
Here’s the online training review
Any other questions, just ask 🙂
Hey Joe,
I discovered your site about a week ago and I’ve really been enjoying the info! I’ve recently been thinking about taking steps to become a personal trainer when I move back to the US in a couple of years, and I’ve started reading lots of texts books and whatnot and researching certifications etc.
A personal trainer website is a long ways away for me, but I’m wondering what kind of information you think is relevant to include on the site for someone who is just getting started. I read your article about what to include on a business card and thought it was great, and I’d love to see a similar article regarding websites.
As for the content of this post, it’s great and so thorough! I wish I would have had this when I started my own word press blog(s), as you’ve really outlined the steps super well. Kudos!
Hi Chelsea, so happy you were able to find me!
Do you want to make your website around your journey of becoming a personal trainer? if yes, then Id say chronicle everything you do – what works and what doesn’t and what you have discovered whether it is from the books you are reading to the exercises you are doing. Also try to address the questions they are asking themselves about being a personal trainer. If you are asking that question, odds are others are asking the same questions too. Don’t be afraid to be controversial. if you disagree with something or have a new take on an issue, blog about it. When you decide on what certification to go after, blog about how you are studying and what stuff you are strugging with as well as what questions come to you as you are studying. Basically, use your site to help others. if you do that, I think people will be very glad with what you create.
Just be yourself and be honest with people. If you have seen my other site SupplementClarity.com you may know I don’t hold back when I think something isn’t worth it.
If you work out and have specific exercise goals, try also blogging about that too, again, talk about about what is working for you and what is not working.
I’ve wanted to do more with this website topic as Ive discovered this love for blogging over the last few years. Ive written 7 books and nothing gets more attention than my websites. The ability to write something in my living room and potentially reach people around the world, is truly a blessing and very rewarding to me. Ill see what I can do about blogging more about blogging and websites. I do have a lot to say about it 🙂
I like your website by the way – and I’m a big fan of podcasts as well. I can make some recommendations if you like 🙂
Wow, Joe, thanks for your reply!
Those are some great ideas, I’m definitely feeling inspired to write more.
I’d love to hear any podcast suggestions you have as I’m trying to soak up any and all information at this point. Thank you!
Chelsea, That’s great! Here are some of the podcasts I like listening to (many are about blogging)
Niche Site Tools
Niche site pursuits
Learning With Leslie
Late Night Internet Marketing
Internet Business Mastery
SEO 101
Beginner Internet Business
Smart Passive Income
Ask Pat
Ask Jordan
Nutrition Diva Quick and Dirty Tips
Joe Dimatteo (ask the pharmacist)
WordPress Plugins A to Z
2CreateAWebsite
SEO Podcast Unknown Secrets of Internet Marketing
Coffee Break Blogging
Kindle Chronicles
Leo Laport The Tech Guy
The Thomas Jefferson Hour (I like history)
Useless Information Podcast (I like useless information)
Clark Howard (consumer advocate)
That should give you a LOT to listen to 🙂
Amazing! I can’t wait to load up some new ones! Thanks again for all of your help 🙂
Glad to help Chelsea, let me know if I can be of any other assistance 🙂
Hey Joe, I’ve used wordpress thanks to your advice and I’m using a free 2014 theme. I think it looks professional, but I would love to hear your opinion. It’s tasmanpt.co.nz
Stephen, Ive heard good things about the free 2014 wordpress theme but have never used it. I know with premium themes its easier to make a lot of changes and get free updates as the software maker improves it. your site looks good and if its working for you, Id say stick with it.
Thanks for the response and looking at the site, I really appreciate it
Thank You Joe. Excellent post. Bookmarking so i can come back too it.
Shane, thanks I’m glad I was able to help 🙂
Good stuff here, Joe.
I’m working on a Word Press site right now for a client. All of this is so new to me. I’ve downloaded Suffusion for free, but I’m trying to get a 2 to 3 column layout in some parts of his pages and have no idea how or if Suffusion supports this. May be giving you a call soon!
Thanks Debra, Im not familiar with “Suffusion” is that a wordpress theme? I know in Genesis theme or Thesis Theme they easily let you pick the column lay out with a click of a button.
Wow! Very comprehensive Joe.
Nice work. It clearly shows that starting a website isn’t too difficult, just a lot of steps!
Dustin, thanks for your kind words – and for your pod cast also! For anyone who doesn’t know, Dustin does a very informative podcast on websites and making your site the best it can be. You can subscribe to it at his website and on Itunes also.
Hi Joe, thank you for the thorough information on how to build a blog/website. With all the things out there, it is difficult to choose the best one and implement it. You suggested using the Thesis theme, but there are 3 different thesis themes (Thesis Basic, Thesis Basic Plus and Thesis Professional) Which one would you suggest?
Wendy, that’s a great question. I looked at the different options for Thesis and I feel arguments can be made for both “Thesis Basic Plus” and “Thesis Professional”.
If your looking for the long term, then Thesis Professional is best. This is because You do get lifetime upgrades. Downside right now is that they don’t have the social media box or email sign up forms up yet. you’ll get those when they are available. Thts not really a big deal because there are free wordpress plugins for these.
With Thesis Basic Plus you get 12 months of updates.
I think they are going with Skins to compete with Genesis which I also recommended and like.
So overall, I would say think about what you want your website to do long term. I think mostly people are interested in websites that help them more than sites that look “pretty” so skins aside I think the updates are most important if you are going to be using your website long term. As such I’d go with either the pro or basic plus versions.
let me know which one you get and do show me your site when its up and running 🙂
let me know if you have any other questions Wendy!
Thank you Joe. I have spent so much time trying to decide whether to do a Word Press or a Sit Build it! or a Stores Online or a Yola!… Geez! All these choices and I probably never will get around to actually doing it. I made the site you see up now nearly a dozen years ago, and it sure need an update. When did ten years go by just like a SNAP???!
But Rip Vanna Winkle is back awake, now, and although this old gal WAS a Zombie, I am actually ALIVE again for real!!!!! Did I say, thanks . Yep, I did. Well, I am saying it again…. You’ve made my decision easier to make!
Hey Debbie, thanks for your kind words! I’m happy that I was able to help you. I know how hard it is trying to decide about how to make a website. I spent about $1600 on my first website and it was a mess. Once I discovered WordPress, I never looked back. I really think you’ll love WordPress.
I think your tudorscientific.com website looks pretty good so you did a good job considering it was 10 years ago. I know things were a LOT harder to do back then. If you did that 10 years ago, you will be able to do a LOT more now with WordPress. Considering what you do now with your website, do check out that Genesis Theme I mentioned. They have several plugins that work with the Genesis theme that might make things more senseless.
let me know if you have any questions 🙂